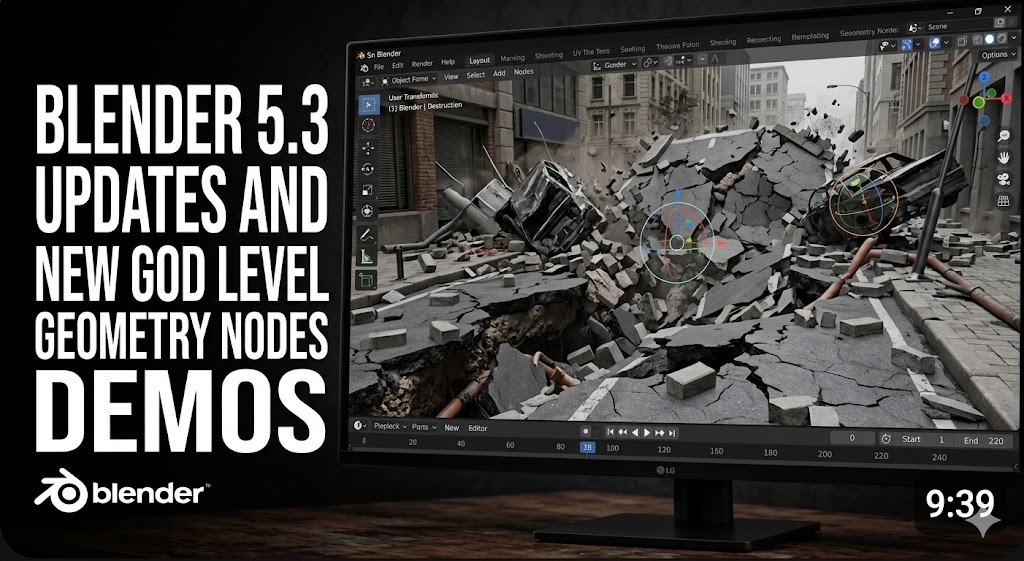


It’s that time of the week where we look at some amazing displays of what Geometry Nodes can do, and this week has a wide variety of demos—from bubbles to procedurally written papers, some physics, and a lot more. So let’s jump in.
muscle physics
Let’s start with this muscle physics simulation by Miettinen. Usually, when you want to do a muscle jiggle simulation like this, you have to rely on cloth or soft body simulations, or even an addon—but all of those options are either expensive or computationally heavy. Miettinen’s solution is to create a jiggle solver directly in Geometry Nodes.
bubbles
You can make bubbles like this—not entirely inside Blender and not entirely inside EmberGen—but by combining the two using Geometry Nodes. CGMatter simulated the bubbles in EmberGen as a smoke simulation, which is usually guided by a particle system. You can import that into Geometry Nodes, convert it into mesh bubbles, add some noise and a background, and you end up with some really good-looking bubble simulations like this.
peak proceduralis
I’m a Blender loyalist, but that doesn’t stop me from checking out the competition. It’s actually a great way to see what’s missing or what could be improved. And for Geometry Nodes, the biggest competitor isn’t even Houdini—it’s Unreal Engine’s PCG system. Take a look at these generators by Polygonflow. The cliff generator is something Geometry Nodes can already do, but then they mix in rigid body physics with instancing and brushes—some for pulling things together, others for pushing them apart. No amount of procedural scattering is beating that. They have other generators too, but most of those Geometry Nodes can already handle. The real advantage comes when they mix in physics.
diagram generator
Look at this ingenious way of making diagrams and drawings for books using Geometry Nodes. They’re flattening 3D geometry into a 2D shape using UV coordinates. The technique itself isn’t that complicated—the genius part is realizing that you can actually do that. Then you connect different lines, scatter some words and letters, and suddenly you have a procedurally generated paper. It’s a great demonstration of just how many ways you can use Geometry Nodes.
church
Thinking of modeling a church? How about you don’t—because IRCCS has a free procedural church model they’re giving away. And if it’s not your style, that’s not a problem at all, because it’s fully procedural. You can change the design, height, width, and a lot of other features. While it’s designed as a northern European town church, converting it to a different architectural style isn’t that hard—just swap out the different parts and you’re good to go. They’re basically giving away an entire French town, or at least the building blocks to make one easily—houses, towers, bridges, and more.
grass physics
This would probably crush your computer if you used a hair system, but Jesse once again shows that when it comes to Geometry Nodes, he’s in his own league. He uses a point domain to simulate collisions and then hands that simulation data over to a shader. What you’re seeing isn’t actual geometry—it’s Eevee displacement doing its thing. This makes it incredibly fast to render millions of grass blades, and you still get ambient occlusion, shadows, and a lot of detail that Eevee would struggle with if it had to render actual geometry.
corn
I don’t know why this kind of reminds me of the greatest TV show of all time, Smallville. I know it’s grass, but the scale makes it look like corn—or maybe it is corn that looks like grass. Either way, the effect is satisfying. It looks like they’re using curves, specifically a curve tangent, to direct the rotation of the plants. I might actually add a tool like this to my new Blender UI design—it shouldn’t be too hard to make. And voilà, as expected, if you align the rotation of instances to the curve tangent, you get the same effect.
tongue rig
These days, if you want the most flexible rig for your character, Geometry Nodes is becoming the go-to. Look at this tongue rig by Grubmüller—I actually found this guy on LinkedIn, didn’t even know people were posting this kind of stuff there. The rig uses a curve setup along with the new Bone Info node in Blender 5.1. Just amazing stuff.
clouds and atmosphere flythrough
Most of the time, skies are just backgrounds in renders, mainly because it’s hard to make scenes above the clouds look convincing. But not for Wolf. These layered clouds were made using Geometry Nodes, and they look incredible. If you want to create a multi-layered cloud system like this, Wolf is actually selling the generator on Superhive—you can check it out in the description.
wood grain
https://www.reddit.com/r/blender/comments/1qa223f/geometry_nodes_wood_grain_effect_for_3d_printing/
If you’re into 3D printing, check out Deadsplicer, who’s using Geometry Nodes to add wood grain detail to prints. Blender already comes with a lot of procedural textures, and if you tweak them a bit, you can create all kinds of surface detail. The wood grain effect is a perfect example—add some paint on top and you might end up with something that looks very close to the real thing.
Source: