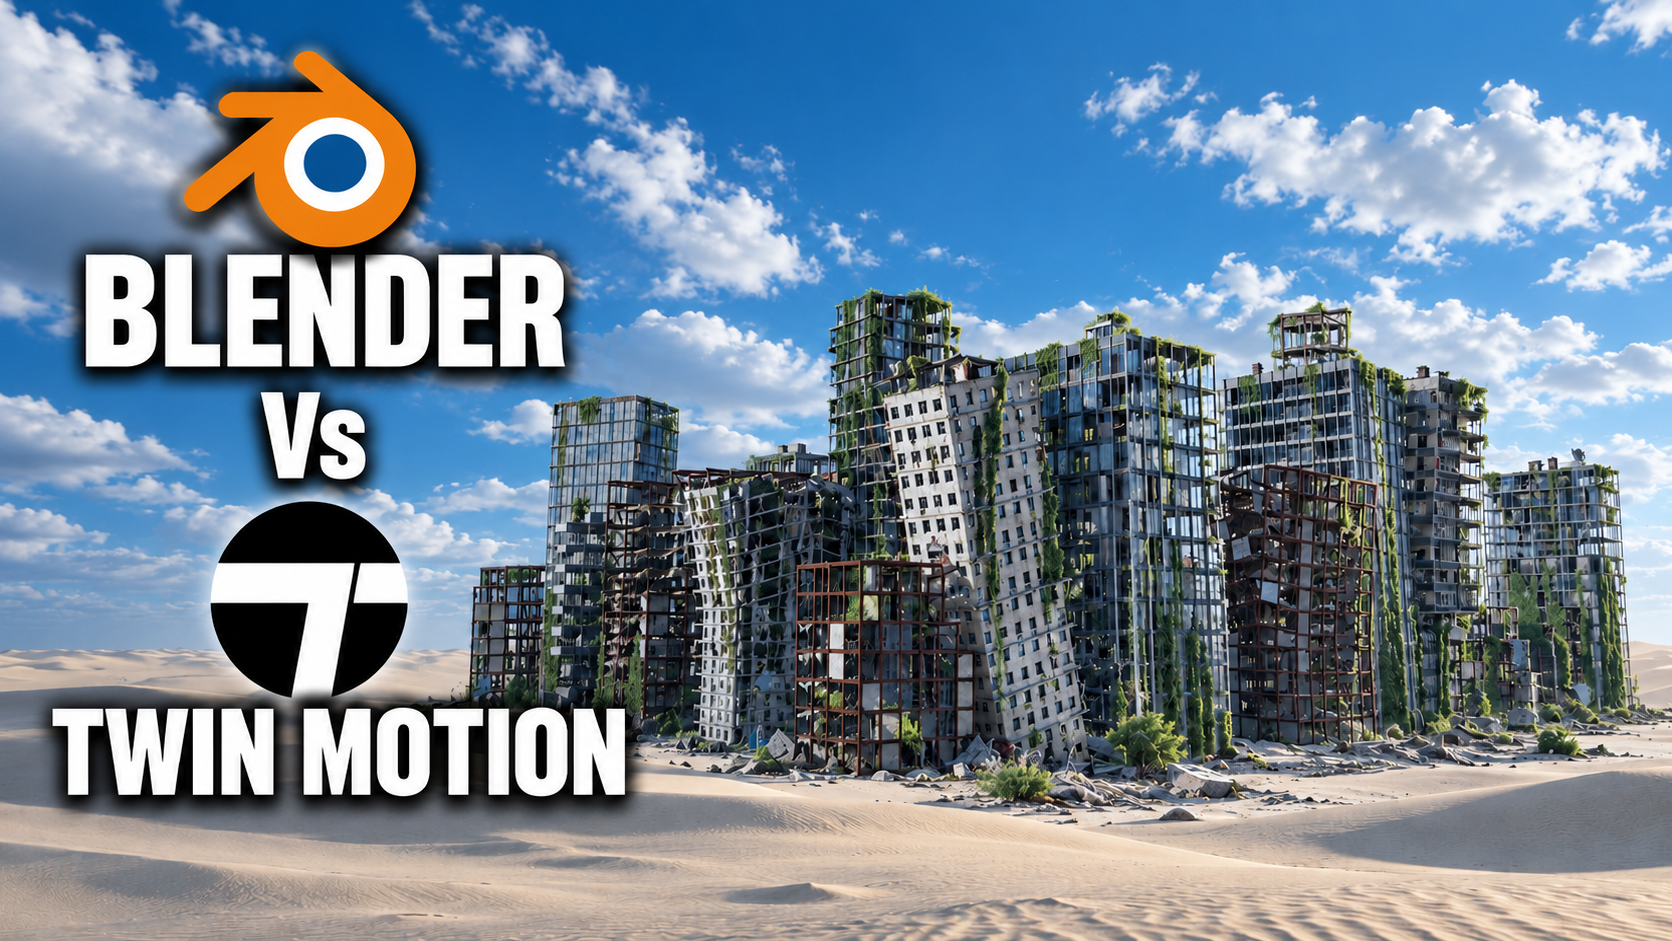

BigRender is a standalone GPU path tracer with a realtime twin, a post-processing stack, a small editor and a live link to Blender. It was built with Claude in under six hours of hands-on time. It renders a 2.1-million-triangle valley with three collapsing towers, path traced at about 11 fps at 720p and in its realtime mode at about 61 fps, on a 2020 RTX 3070.
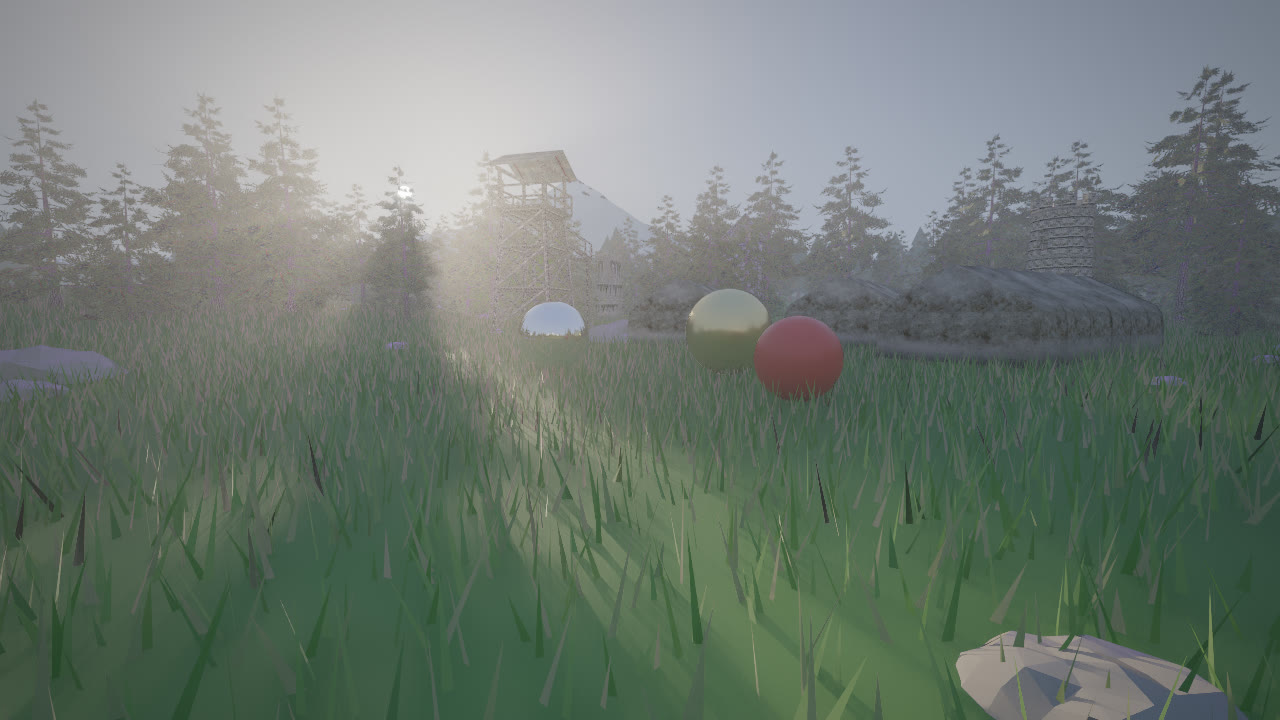
The Mountain valley, path traced and denoised at 720p.
It is not Cycles. It is a working answer to a narrower question: what is the smallest honest render engine that looks good, stays interactive and plugs into a real artist's tool? This article walks through every part of it.
What it does, in one list:
- Path traces triangle scenes with metal, rough glass, emission, image textures, normal maps and alpha cut-outs.
- Swaps to a rasterised realtime engine with the same materials at the press of Tab.
- Denoises with an edge-aware filter and can render below full resolution and upscale, a DLSS-style trade.
- Adds bloom, god rays, vignette, chromatic aberration, film grain and an AgX tone curve.
- Streams a Blender scene and camera live, and sends selections, materials and gizmo edits back.
- Plays baked destruction simulations from an asset library and renders the timeline straight to MP4.
At a glance
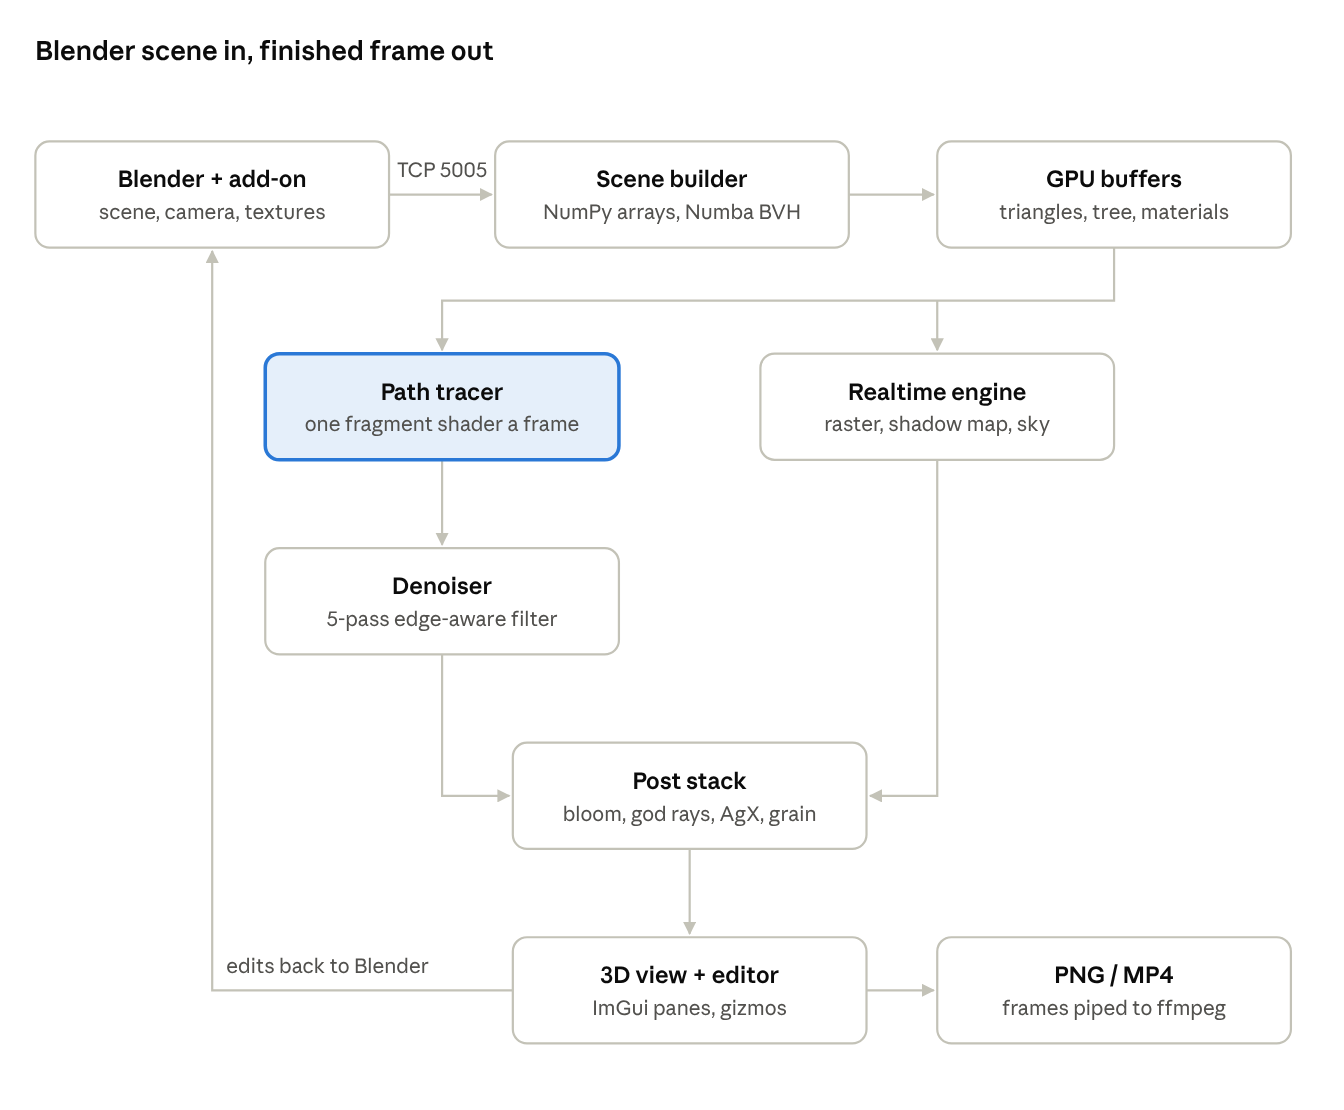
One frame, from Blender to the screen.
The path tracer and the realtime engine read the same GPU buffers and the same material code; both feed one post stack. Selections, materials and gizmo edits travel back to Blender over the same socket.
The stack
No game engine sits underneath. A handful of small libraries handle the plumbing, and everything that decides what a pixel looks like was written for this project.
- Window and input (what it uses: GLFW; what it does there: one window, keyboard and mouse)
- GPU (what it uses: ModernGL over OpenGL 4.3; what it does there: shaders, textures, storage buffers (SSBOs))
- Maths on the CPU (what it uses: NumPy; what it does there: scene arrays, transforms, packing)
- Fast CPU loops (what it uses: Numba; what it does there: compiles the BVH builder and refit to machine code)
- Interface (what it uses: Dear ImGui (pyimgui); what it does there: menus, panes, sliders, gizmo drawing)
- Blender side (what it uses: Blender's Python API; what it does there: a single-file add-on that exports and listens)
- Video (what it uses: ffmpeg; what it does there: encodes renders to MP4)
Written from scratch: the BVH builder, the path tracing shader, the material model, the denoiser, the realtime shaders, the post stack, the network protocol, the editor and the asset pipeline. At the time of the build that came to about 6,200 lines: roughly 3,600 of Python for the app, 790 of GLSL, 610 for the Blender add-on and 1,160 for the first realtime grass demo.
The path tracer
The whole path tracer is one fragment shader drawn over a full-screen triangle, once per frame. Each pixel shoots a ray, follows it as it bounces, adds up the light it finds, and blends the result into a running average.
Scene on the GPU. Every triangle is packed into a 128-byte record: three positions, three normals, three UV pairs and a material index. A second buffer holds the BVH, a tree of boxes at 32 bytes a node. A third holds the materials, 20 floats each. All image textures sit in one texture array of 1024 by 1024 RGBA layers. A material refers to a texture with a single number that packs the layer, the colour channel and an sRGB flag (layer * 8 + channel * 2 + srgb), which is how a packed roughness or metal map is read from one channel.
Finding what a ray hits. Traversal walks the BVH with a small stack of 48 entries, always visiting the nearer child first so far boxes are usually skipped. Leaves hold up to eight triangles, tested with the Möller–Trumbore ray-triangle test. Shadow rays stop at the first opaque hit. For leaves and grass cards, a hit on a texel whose alpha is below the material's cutoff is ignored, so light passes through the holes.
Materials. The material model follows Blender's Principled shader closely enough to read it directly: base colour, metallic, roughness, transmission, index of refraction, emission and a tangent-space normal map. Reflection uses the GGX microfacet distribution with Smith shadowing. Glass picks reflection or refraction from the Fresnel term and refracts through a rough microfacet, which gives frosted glass. Thin opaque surfaces such as grass blades mirror their shading normal on the back face instead of flipping it, so a blade lit from the sky stays lit from both sides.
Light. The sun is sampled directly at every bounce: a shadow ray towards a jittered point on the sun's disc gives soft shadows whose softness comes from the disc's angular size. Everything else, including the sky, glowing objects and bounce light, is found by the path itself. Russian roulette ends paths that carry little energy after the third bounce, and each sample is clamped to cut fireflies.
Accumulation. Two 32-bit float buffers take turns: each frame reads the previous average and writes the new one. While the camera and scene are still, samples pile up and the image converges from static to clean. Any change resets the count. The alpha channel records whether the camera ray reached the sky; the god-ray effect later uses that mask. Two extra buffers record the albedo, normal and distance of the first surface each pixel sees, which the denoiser needs.

Accumulation in the sunlit room: 1, about 16 and 512 samples per pixel, no denoiser.
Depth of field and dust. A thin-lens camera jitters ray origins across an aperture and focuses at the distance under the screen centre. Volumetric dust is single scattering: a point is picked along the first 40 metres of each camera ray, a shadow ray is sent to the sun, and the Henyey–Greenstein phase function weights how much light scatters towards the camera. That is what draws the light shafts through the room's windows and the valley's pines.
Making it fast
A path tracer is only as fast as its tree. The first version split every box down the middle of its longest side and the demo room ran at 15 fps. Three changes took it to interactive speeds on millions of triangles.
A smarter split. The builder now uses the surface area heuristic (SAH): for each box it tries 16 candidate split positions per axis and keeps the one that minimises the expected cost of tracing a ray, which is roughly the area of each child times the triangles inside it. Rays then skip empty space far more often.
Compiled with Numba. The SAH builder is a plain Python loop compiled to machine code by Numba, and it runs without holding Python's global lock, so it can build on a worker thread while the window keeps drawing. It builds about a million triangles a second. Blender scenes are built on that thread whenever they change; the 2.1-million-triangle valley takes about five seconds to load.
A split tree for things that move. Animation broke the first approach: rebuilding or uploading two million triangles every frame meant 130 ms of work per frame. Now every object that moves goes to the end of the triangle arrays and gets its own small subtree under the root. Each frame only that subtree is rebuilt, which takes under a millisecond for a few thousand triangles, and only its slice of the GPU buffers is uploaded. The static part is never touched. The animation update dropped to 16 ms and the realtime engine holds about 61 fps while three towers collapse in the valley.
Edits made with the gizmo on a static object still take the slower path: the whole tree is refitted in place and rebuilt in the background a few times a second.
The denoiser and render scale
At two samples a frame a path traced image is grainy. The denoiser cleans it up without blurring the picture, and render scale trades resolution for speed the way DLSS does. NVIDIA's DLSS needs NVIDIA's own libraries, so this is a hand-written version of the same idea.
Guide buffers. As it traces, the renderer records the albedo (surface colour), normal and distance of the first surface each pixel sees. Mirrors and clear glass are looked through, so a reflection's guides come from the thing reflected.
An à-trous filter. Five passes of a 5 by 5 blur, each pass spreading its samples twice as far apart (1, 2, 4, 8 and 16 pixels), cover a wide area cheaply. Each neighbour's weight drops when its normal points elsewhere, when its distance differs, or when its brightness differs too much. The lighting is filtered with the albedo divided out and multiplied back after, so textures stay sharp while only the noise is smoothed. The first pass also clamps each pixel to its brightest neighbour, which removes isolated fireflies.
It relaxes as samples build up. The brightness tolerance shrinks with the square root of the sample count, so a fresh, noisy frame is smoothed hard and a converged one is barely touched.
Render scale. At 75, 50 or 33 percent the path tracer traces fewer pixels, the denoiser cleans them, and the post pass upscales the result to the view with filtering. At 50 percent it traces a quarter of the pixels.
It is not an AI denoiser. At 1 to 4 samples, glossy reflections such as a wet floor come out soft; they sharpen as samples accumulate. One experiment kept them sharp but grainy, and it was reverted because a clean, slightly soft image reads better on video.
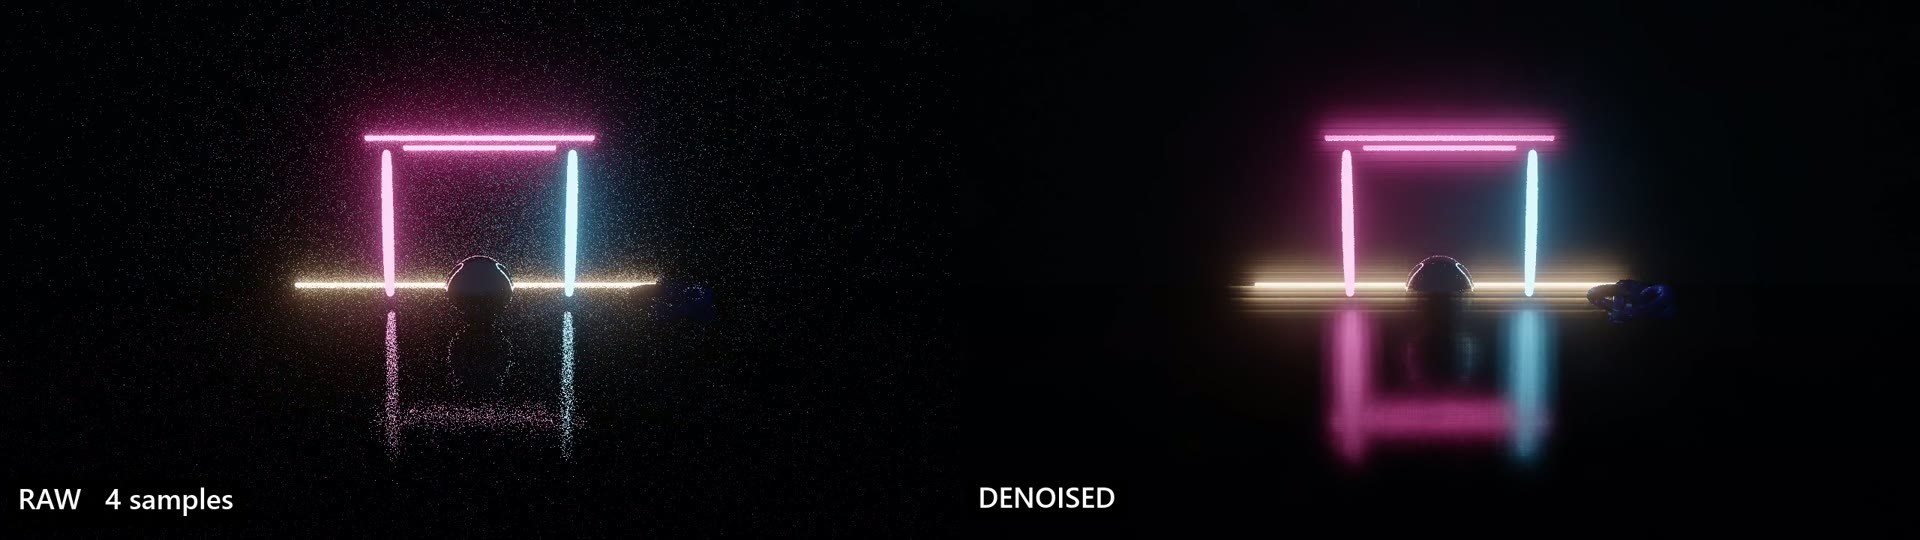
Neon night at 4 samples per frame: raw on the left, denoised on the right.
The realtime engine and the post stack
A rasteriser on the same materials. The realtime engine draws the same vertex data with ordinary rasterisation and shades it with the same material code as the path tracer, from the shared pt_common.glsl. Pressing Tab swaps engines without touching the scene, so a shot can be blocked out in realtime and finished path traced. A wireframe mode and a wireframe overlay share the same buffers.
It lights a pixel with three things. The sun comes through a 4096 by 4096 shadow map with 5 by 5 soft filtering. The sky gives ambient light: a blurred sky colour for diffuse, a sharper one for reflections, a cheap horizon term for occlusion, and a faint warm term standing in for bounce light. Glass is a tinted see-through. Textures are mipmapped here to stop leaves shimmering, while the path tracer reads full resolution.
What it lacks is real global illumination, shadows from lamps, refraction and reflections of the scene itself. Those are exactly what the path tracer adds, one key away.

One shot, three engines: path traced, realtime and wireframe, switched with Tab.
The post stack runs after either engine, on the high-dynamic-range image:
- Bloom: a soft bright-pass, then a six-level chain of downsampled and upsampled blurs, added back on top.
- God rays: a radial blur of the sky mask outward from the sun's position on screen. It only appears when the sun is in view; the path tracer's dust gives true shafts from any angle.
- Final composite: exposure, a tone curve (AgX to match Blender, ACES, Reinhard or none), contrast and saturation, chromatic aberration towards the edges, vignette, film grain and dithering.
- Overlays: the wireframe composite and the orange selection outline, drawn from a mask of the selected object.
The result lands in an 8-bit texture that the interface shows as the 3D view, and that screenshots, image renders and MP4 frames are read from, so saved images never include the interface.
The Blender live link
BigRender runs as its own app, and a Blender add-on streams the open scene to it over a local network socket. Start the add-on from the 3D view's sidebar and the scene appears in the renderer; move something in Blender and it moves in the render.
The protocol. Both ends speak one message format over TCP on 127.0.0.1:5005: two 32-bit lengths, a small JSON header, then a binary payload. A scene message carries every triangle's positions, normals, UVs, material and object id as raw arrays, plus the materials, the sun, the world colour and, only when the set of images changes, the textures. A camera message carries the viewport camera; when Blender looks through the scene camera, its lens and depth of field come along. Blender is Z-up and BigRender Y-up, so every position becomes (x, z, -y) on the way.
Reading Blender's materials. The add-on walks each material's node tree from the Principled BSDF and follows links back to image textures, through Separate Color nodes for packed roughness/metal maps, through Normal Map nodes and through Math nodes for alpha cut-outs. Images are resampled to 1024 by 1024 and stored in the texture array.
Keeping up with edits. Blender's dependency graph reports what changed after every edit. The add-on resends the scene 0.15 seconds after the last change, and at most every quarter second while you keep dragging, so continuous moves still update a few times a second. A 20,000-triangle scene rebuilds its tree in about 20 ms.
Both directions. Clicking an object in BigRender selects it in Blender and vice versa. A material from BigRender's library becomes a real Principled material on the object in Blender (named BR Gold and so on), and gizmo moves, rotations, scales, duplicates and deletes are applied to the real objects, each as a Blender undo step.
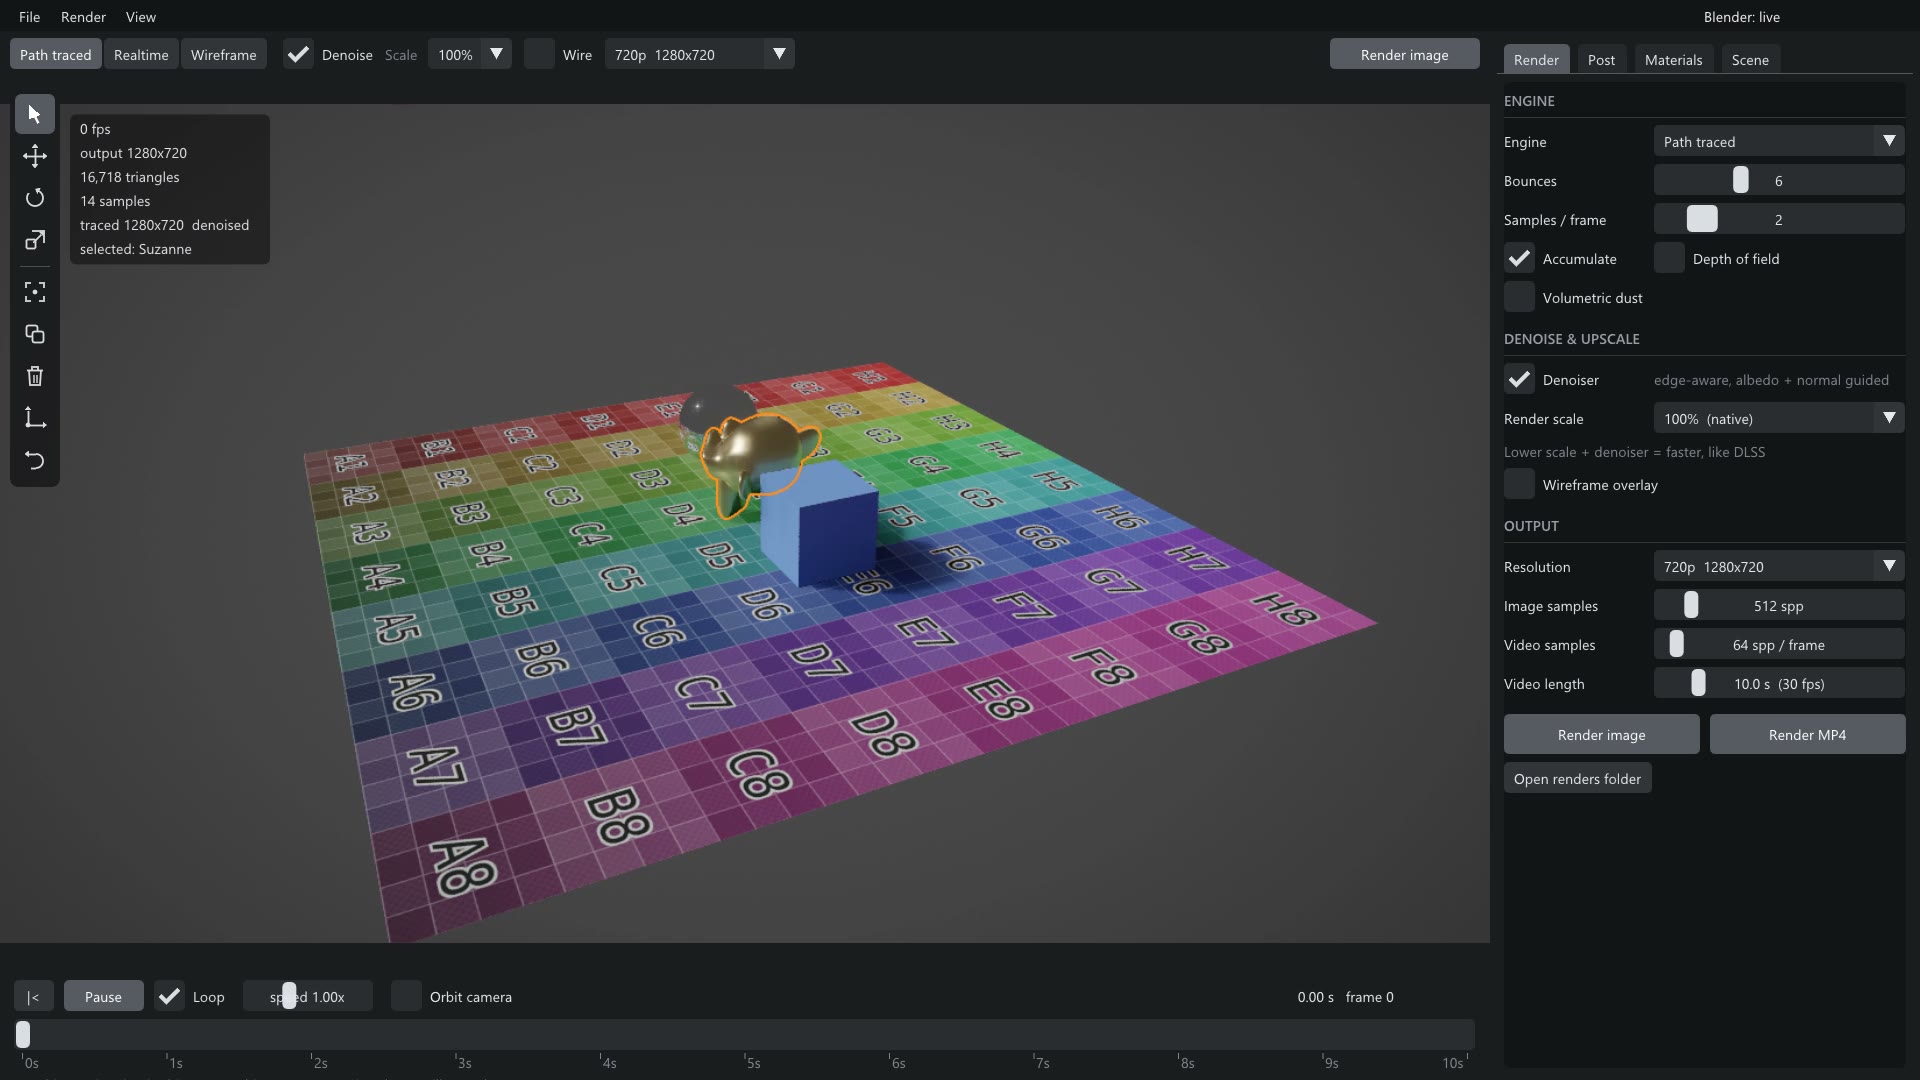
A Blender session driving BigRender live: Suzanne selected in Blender and given a gold material.
The editor
The interface is Dear ImGui in a fixed three-pane layout with a dark, colourless theme: the 3D view, a properties pane and a timeline, under a File / Render / View menu bar.
- 3D view: the rendered image (fit to the pane, or a fixed 720p, 1080p, 1440p, 4K, vertical or square output that is letterboxed in the view and in fullscreen), a toolbar for the engine, denoiser, render scale and output resolution, and a stats overlay.
- Toolbar and gizmos: a Blender-style strip of Select, Move, Rotate and Scale tools plus Frame, Duplicate, Delete, Reset and Undo. The gizmos are drawn with ImGui's draw list over the image, projected from 3D each frame; dragging an arrow maps mouse pixels to world units along that axis, a ring drag measures the angle swept around the object's centre, and Ctrl snaps.
- Properties: Render (engine settings, denoiser, output, Render image and Render MP4), Post (every effect with its own toggle and slider), Materials (a library of 15 presets with previews shaded in NumPy at start-up) and Scene (demo scenes, sun, camera, link status).
- Timeline: play, loop, speed, orbit camera, sun time-lapse and a scrubber. Render MP4 steps the timeline at a fixed 30 fps, accumulates the chosen sample count per frame and pipes the frames to ffmpeg.
Each object keeps its rest pose, an optional animation and a user transform from the gizmo, combined as user transform times animation. That is what lets an animated object be moved, and what undo restores. Keys follow common editor conventions: WASD with E and Q to fly, right-drag to look, 1 to 4 for tools, F to frame, Ctrl+Z to undo, F12 to render.
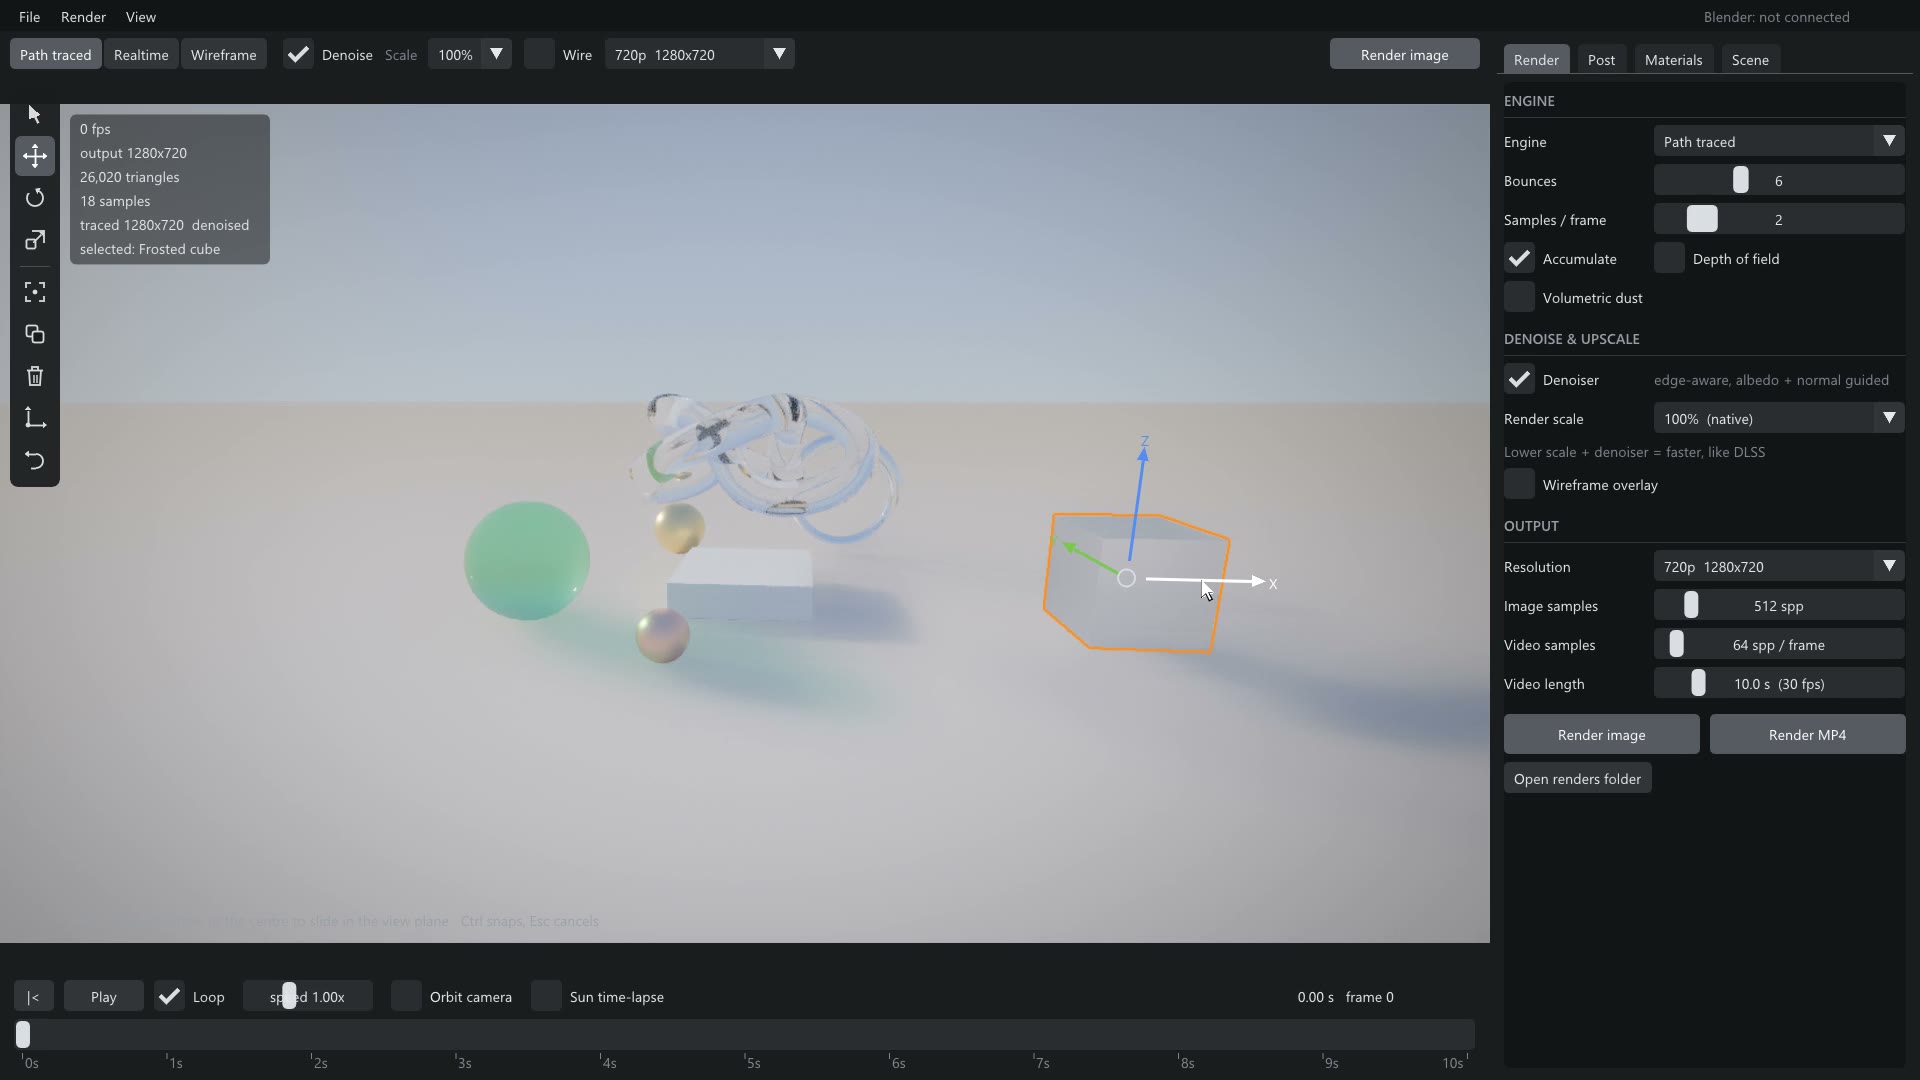
The editor: toolbar on the left, the move gizmo on a selected cube, properties on the right, timeline below.
Assets, collapses and atmosphere
Ten demo scenes ship with it: five built procedurally (a sunlit room, a material lineup, a glass garden, a neon night, a gyroscope) and five built from a 278-asset library (a mountain valley, a medieval village, gothic ruins, a military outpost and a bronze-age farmstead).
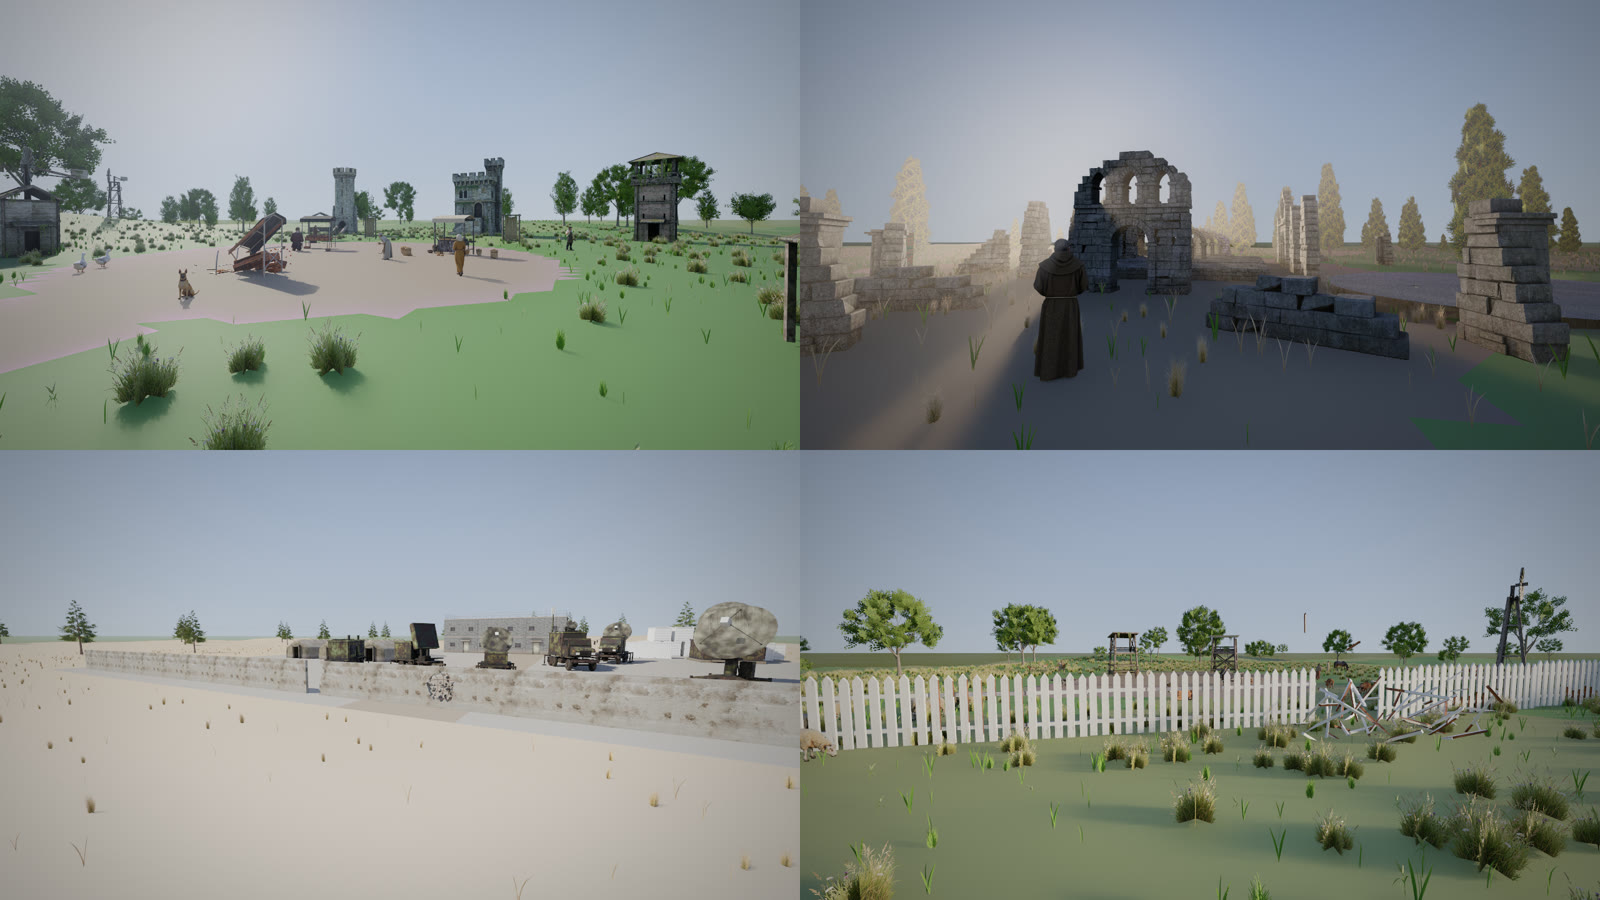
Medieval village, Gothic ruins, Military outpost and Bronze-age farmstead.
The asset pipeline. A script runs Blender with no window, opens each library asset, evaluates its meshes and reuses the add-on's material reader to write one uncompressed NumPy archive per asset: triangles, materials and 1024 px textures. 119 assets came to 1.6 GB. When a scene is built, each asset's textures are hashed and identical layers are shared, so the medieval buildings that use one atlas upload it once. Scenes too heavy for the texture budget drop to 512 px layers.
Baked collapses. The library's destruction effects (falling towers, breaching walls, sinkholes, a smashed fence) are physics simulations baked to vertex animation. The exporter samples them at 12 fps; at runtime BigRender interpolates between frames and rebuilds the moving subtree described above. Each collapse starts at its own time on the timeline.

The Gothic ruins' bell tower collapsing: a baked simulation played back in the path tracer.
Atmosphere. Outdoor scenes fade distant surfaces into the sky's horizon colour with distance (aerial perspective), the sky continues hazy below the horizon instead of switching to a dark ground colour, and the volumetric dust also lights rays that reach the sky. Together those remove the seam where the ground meets the sky. The valley's grass is 300,000 single-triangle blades, generated procedurally and shaded like the ground they grow from.
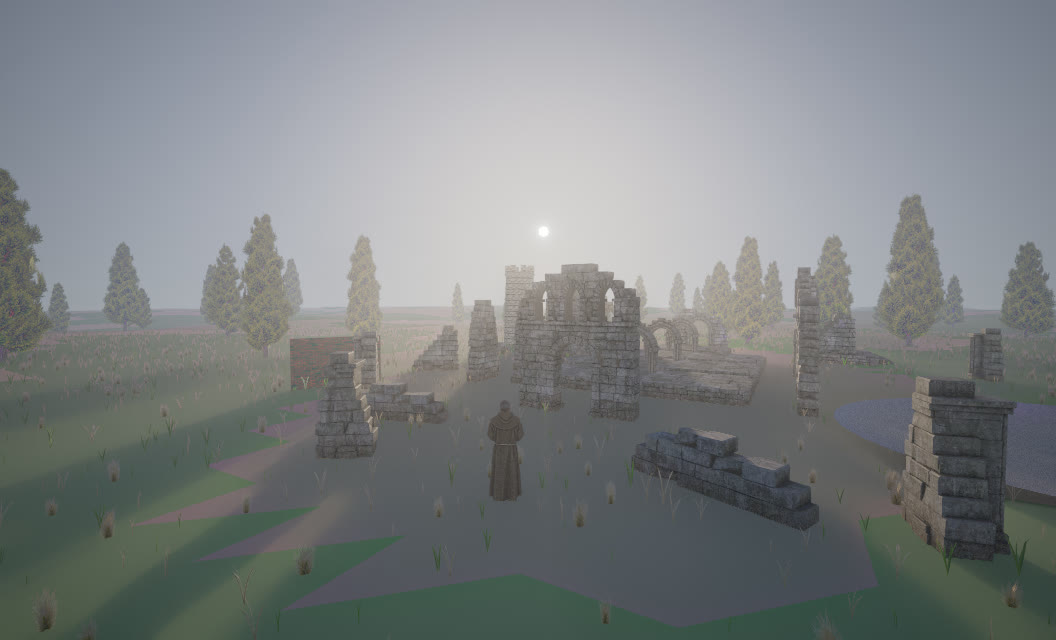
Aerial perspective at dusk: distant ground fades into the horizon colour.
By the numbers
All measured on one desktop with an RTX 3070, in November 2026.
- Demo room, path traced at 2 samples a frame, with the interface: about 40 to 60 fps
- Simple Blender test scene (17,000 triangles), path traced: about 100 fps
- Mountain valley, 2.1M triangles, path traced at 720p: about 11 fps
- Mountain valley while three towers collapse, realtime engine: about 61 fps
- Animation update in that scene, before and after the split tree: 130 ms, then 16 ms per frame
- BVH build: about 1 second per million triangles
- Code at the end of the build: about 6,200 lines
- Hands-on build time, by the author's count: under 6 hours
The build ran on a $20-a-month Claude Pro plan with no extra charges.
Limits, and what it would take to be a production renderer
BigRender gets the core of physically based rendering right for sunlit scenes with simple materials. What separates it from Cycles is a long, well-documented list rather than any missing idea.
- Only the sun is sampled on purpose (why it matters: scenes lit by lamps, area lights or neon stay grainy; what fixes it: multiple importance sampling and a light tree)
- No HDRI worlds (why it matters: a linked sky image is replaced by the built-in sky; what fixes it: load the image and sample its bright regions)
- One Principled node, no node graph (why it matters: procedural textures fall back to a flat colour; what fixes it: compile node trees to shaders, or bake them on export)
- No subsurface, real volumes, hair or motion blur (why it matters: skin, smoke, fur and fast motion are out of reach; what fixes it: each is its own integrator feature)
- Instances are copied triangle by triangle (why it matters: forests and particles explode memory; what fixes it: a two-level BVH with real instancing)
- Hand-written denoiser (why it matters: soft glossy detail at low samples; what fixes it: OpenImageDenoise or OptiX, plus adaptive sampling)
- No render passes, approximate colour management (why it matters: no compositing workflow, colours only close to Blender; what fixes it: passes to multilayer EXR, OpenColorIO)
- Renders in its own window (why it matters: not Blender's F12 or its engine list; what fixes it: register as a Blender render engine)
- No hardware ray tracing (why it matters: the RTX cores sit idle; what fixes it: OptiX or Vulkan ray tracing)
The three that would change the most first are light sampling with an HDRI world, a node evaluator, and real instancing with Blender's F12 render path and passes. Cycles took about 15 years and a team to cover this list well; each item on its own fits the same pattern used here, one focused session at a time.